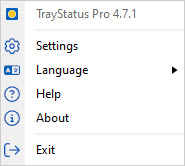
The right-click context menu on any TrayStatus Indicator allows you to access the Settings window, or exit TrayStatus. Exiting TrayStatus will close all Indicators.
- Settings: Opens the TrayStatus Settings window.
- Language: This menu item allows you to change the user interface language for TrayStatus.
- Help: This menu item opens the TrayStatus online help in your default browser.
- About: This menu item opens the About tab in the settings window for information on Binary Fortress Software.
- Exit: Exits TrayStatus. This will close all Status Indicators.
The TrayStatus Settings window is where you'll configure all of your TrayStatus Indicators and other options. You can enable/disable the default Indicators (CapsLock, NumLock, etc) or add/remove custom Performance Counter Indicators. You can also choose your icon theme in the Settings window.
To access the Settings window, right-click any TrayStatus Indicator in the system tray (notification area) on the taskbar and choose "Settings." If you don't have any Indicators enabled, launching TrayStatus from the Start menu will open the Settings window.
This tab allows you to enable/disable Indicators. You can also add, edit, or remove custom Performance Counter Indicators.
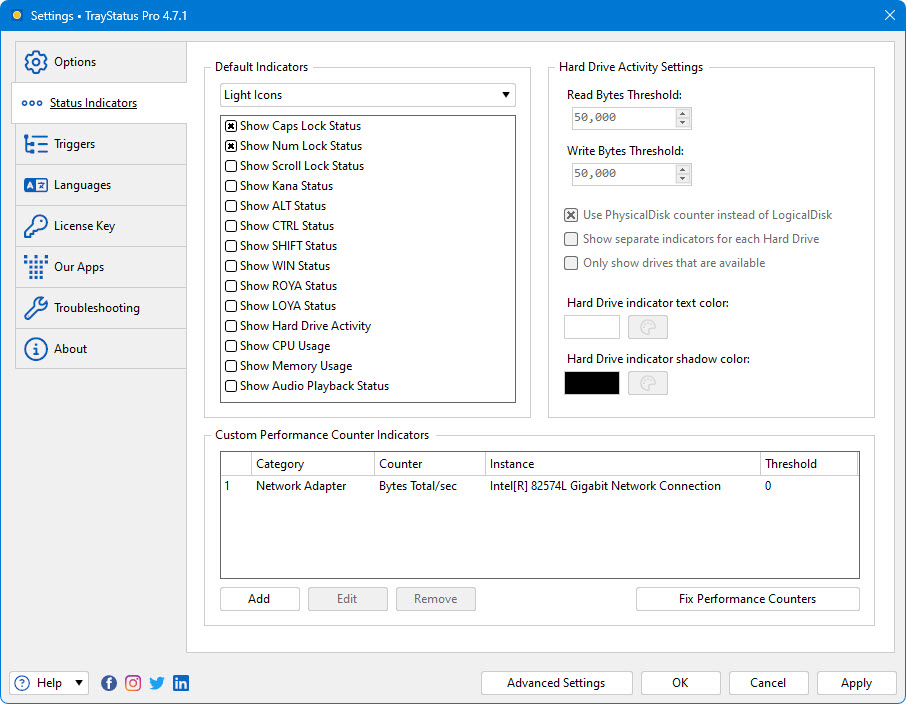
- Icons: This is the icon set that will be used for the status indicators in the system tray.
- Show Caps Lock Status: Enables or disables the Caps Lock Status Indicator.
- Show Num Lock Status: Enables or disables the Num Lock Status Indicator.
- Show Scroll Lock Status: Enables or disables the Scroll Lock Status Indicator.
- Show Kana Status: Enables or disables the Kana Lock Status Indicator. (Japanese Keyboards)
- Show ALT Status: Enables or disables the Alt key Status Indicator.
- Show CTRL Status: Enables or disables the Ctrl key Status Indicator.
- Show SHIFT Status: Enables or disables the Shift key Status Indicator.
- Show WIN Status: Enables or disables the Windows key Status Indicator.
- Show ROYA Status: Enables or disables the ROYA (Japanese Industrial Standard keyboards) Status Indicator.
- Show LOYA Status: Enables or disables the LOYA (Japanese Industrial Standard keyboards) Status Indicator.
- Show Hard Drive Activity: Enables or disables the Hard Drive Activity Status Indicator. You can set the read/write thresholds which control how much data (in bytes) has to be read/written before the up/down arrows show up on the Indicator in the system tray (notification area). Hovering this Indicator in the system tray (notification area) will show the read/write speed in MB/s.
- Show CPU Usage: Enables or disables the CPU Status Indicator. Hovering this Indicator in the system tray (notification area) will show you the exact percentage of CPU used.
- Show Memory Usage: Enables or disables the Memory Usage Status Indicator. Hovering this Indicator in the system tray (notification area) will show the memory used (in GB) vs the total system memory.
- Show Audio Playback Status: Enables or disables the Audio Playback Status Indicator. This Indicator will light up when Windows, or any application on the system is outputting audio.
- Read Bytes Threshold: Sets the threshold in bytes for hard drive read activity. The up arrow will only show on the Status Indicator in the system tray (notification area) if the read bytes/s is higher than this threshold value.
- Write Bytes Threshold: Sets the threshold in bytes for hard drive write activity. The down arrow will only show on the Status Indicator in the system tray (notification area) if the write bytes/s is higher than this threshold value.
- Use PhysicalDisk counter instead of LogicalDisk: When enabled, this option will show one indicator in the tray for each physical drive in the computer. When disabled, TrayStatus will show one indicator in the tray for each partition that has a drive letter assigned to it.
- Show separate indicators for each Hard Drive: Enabling this option will create separate Status Indicators for each drive letter on your system.
- Only show drives that are available: This will force TrayStatus to ignore any drives that aren't available, like a card reader with an SD card inserted.
- Hard Drive indicator text colour: This option allows you to choose the colour of the drive letter overlay on the Hard Drive Activity indicators. It's only used when the "Show separate indicators for each Hard Drive" option is enabled.
- Hard Drive indicator shadow colour: This option allows you to choose the colour of the drive letter shadow on the Hard Drive Activity indicators. The shadow helps make the text easier to read on the icon. It's only used when the "Show separate indicators for each Hard Drive" option is enabled.
- Category: This column lists the Windows Performance Counter category of the counter item.
- Counter: This column lists the Windows Performance Counter name of the counter item.
- Instance: This column lists the Windows Performance Counter instance of the counter item. Only some counters will have the option to select an instance. For example, the Processor counters let you choose a specific processor core as the instance.
- Threshold: This column lists the upper threshold value for the counter. The bar icon for the counter will be divided up using this value, with this value being represented as a full bar.
- Add: Click this button to add a new Windows Performance Counter based indicator.
- Edit: Select an existing Windows Performance Counter based indicator and then click this button to edit it.
- Remove: Select an existing Windows Performance Counter based indicator and then click this button to remove it.
- Fix Performance Counters: If TrayStatus shows an error regarding performance counters when enabling the Hard Drive Activity indicator, or you have missing data when adding Custom Performance Indicators, click this button to try repairing the Windows performance counters. If this doesn't help, feel free to contact us using the Help > Support Request button in the Settings window.
This dialog allows you to choose the Windows Performance Counter that you'd like to use for your custom Indicator. The Threshold option allows you to set a maximum value that will be used for the bar graph on the Indicator in the system tray (notification area). The bar will show as "full" when the Performance Counter value is equal or greater than the Threshold value. This window is accessed via the Add button at the bottom of the Status Indicators tab in the settings window.

- Category: Lists the Performance Counter category that the Counter itself is grouped under. e.g. "PhysicalDisk"
- Counter: Lists the name of the Performance Counter. e.g. "Avg. Disk Queue Length"
- Instance: Lists the Instance of the Performance Counter, if applicable. e.g. "C:"
- Minimum: The minimum value of the selected performance counter.
- Maximum: The maximum value of the selected performance counter.
- Current: The current value of the selected performance counter.
- Threshold: Lists the user specified threshold for the Performance Counter. The Threshold controls what the "maximum" will be for the bar graph in the Status Indicator.
- Auto: Sets the threshold automatically based on the maximum value that has been observed.
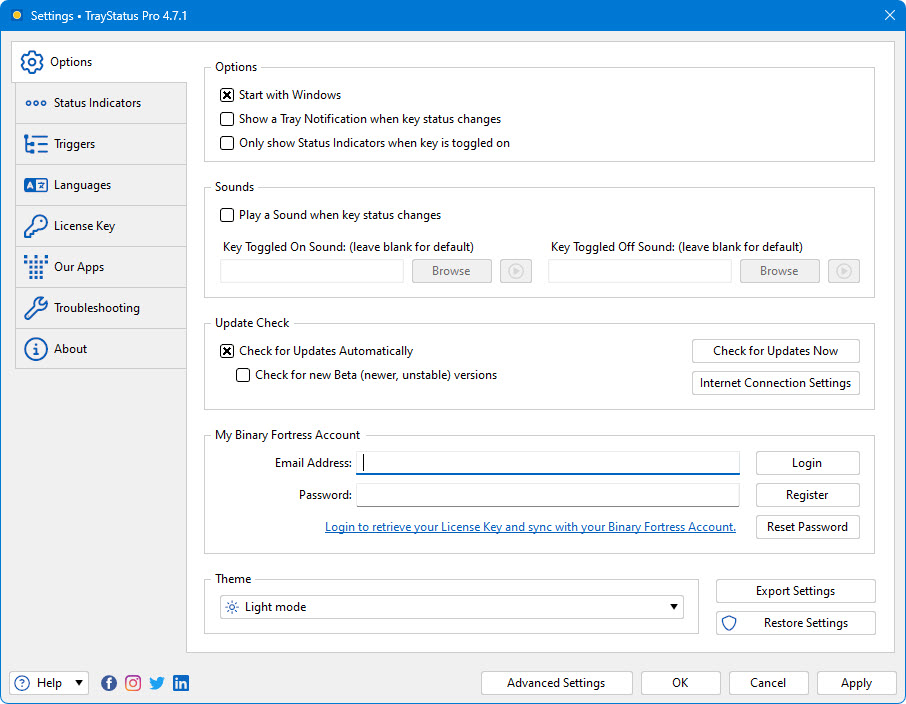
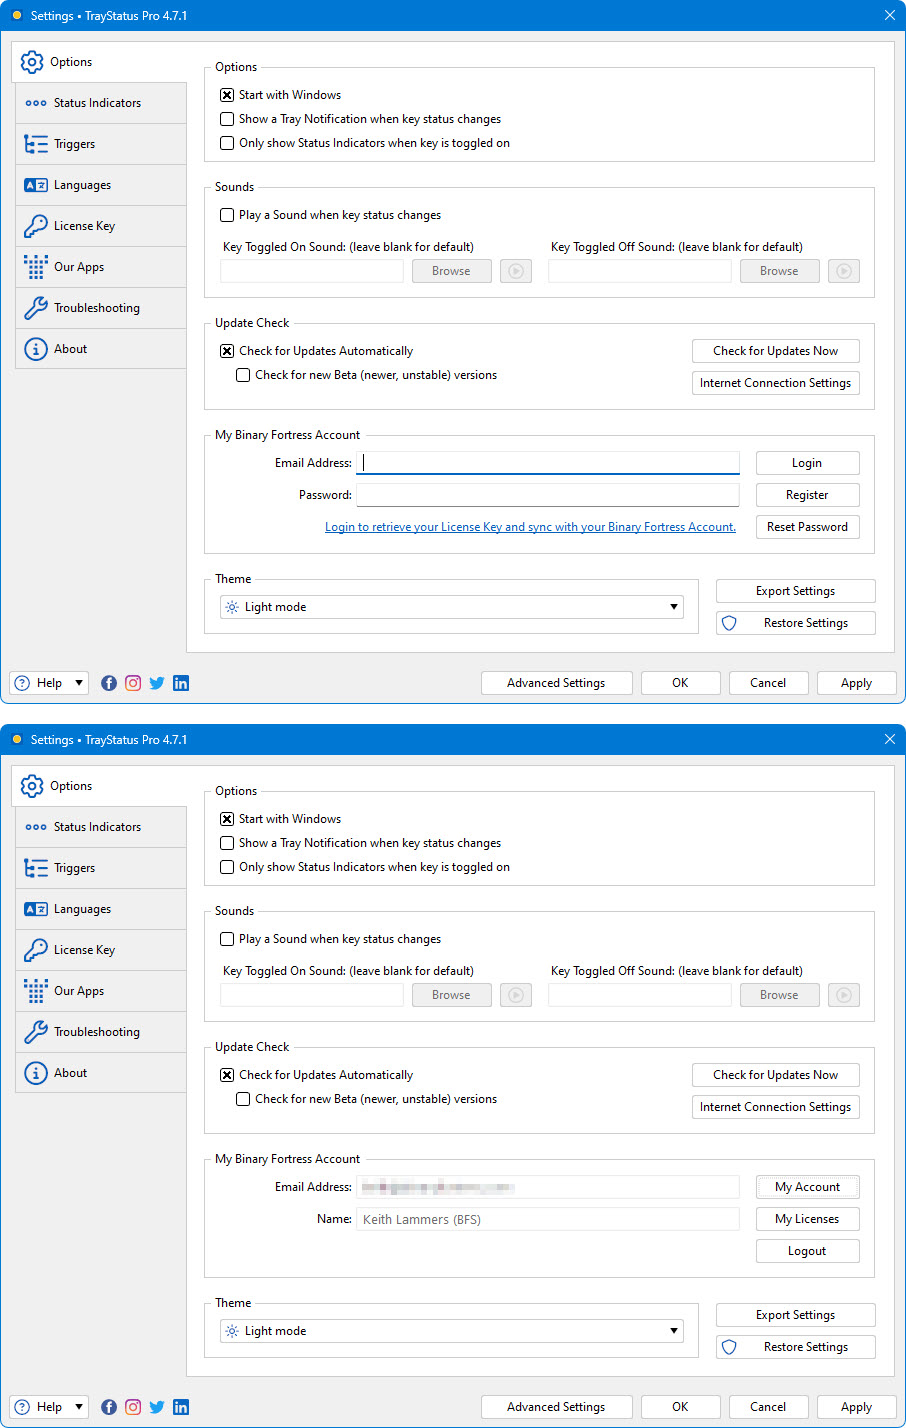
This tab in the Settings window allows you to log onto your Binary Fortress account, check for program updates, and modify application settings.

- Start with Windows: Enabling this option will cause TrayStatus to start automatically when your computer boots up.
- Show a Tray Notification when key status changes: When enabled, you'll see a tray notification balloon (Win 7) or toast notification (Win 8+) when a key lock status changes.
- Only show Status Indicators when key is toggled on: When enabled, TrayStatus will hide the Indicator from the system tray (notification area) when the Status is "off."
- Play a Sound when key status changes: When enabled, TrayStatus will play a sound when the key lock status changes. You can use the default sounds, or specify custom sound files.
- Key Toggled On Sound: (leave blank for default): Click the Browse button next to this option to choose a custom sound file to play when a key lock status is toggled on. You can click the Play button (arrow) next to the Browse button to preview the sound file.
- Key Toggled Off Sound: (leave blank for default): Click the Browse button next to this option to choose a custom sound file to play when a key lock status is toggled off. You can click the Play button (arrow) next to the Browse button to preview the sound file.
- Check for Updates Automatically: Enable this to let this application periodically check for updates.
- Check for new Beta (newer, unstable) versions: Enable this to let this application check for new Beta versions. This setting is not recommended unless you are interested in testing new software.
- Check for Updates Now: Perform an update check right now.
- Internet Connection Settings: Click this button to open the proxy settings window.
- Export Settings: Click this button to export your current application settings to a .REG file. You can use this backup file to import your settings to another machine, or use it to restore your settings if you are re-installing your machine.
- Restore Settings: Allows you to restore your settings from a previously created backup.
- Advanced Settings: Click this button to open the Advanced Settings window.
In the "My Binary Fortress Account" section, you can enter your email address and password to enable easy retrieval of your license key.
- Email Address: Enter the email address for your Binary Fortress Account here.
- Password: Enter the password for your Binary Fortress Account here.
- Login: Enter your email address and password, then click this button to login to your Binary Fortress Account. Once logged in, you can retrieve your license key if needed.
- Register: If you don't already have a Binary Fortress Account, click this button to open the registration page.
- Reset Password: If you've forgotten your password, click this button to open the password reset page.
- Name: When logged in, the name on your account shows here.
- My Account: Click this button to access your account page on the our website.
- My Licenses: Click this button to view and apply your license key.
- Logout: Click this button to logout of your Binary Fortress Account. No items will be synced while logged out.
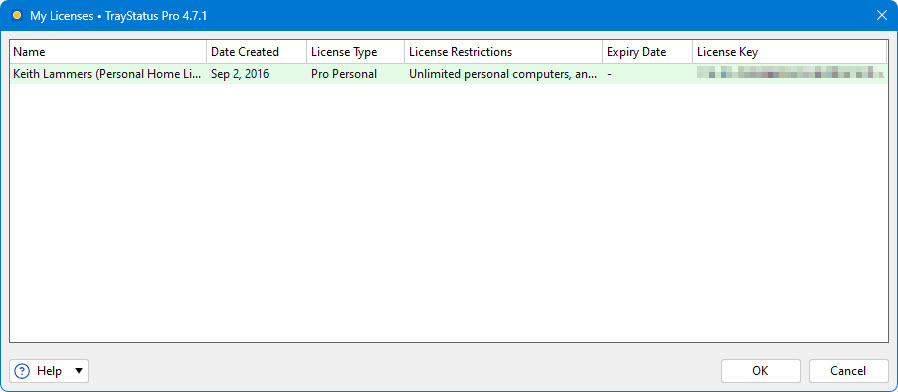
The My Licenses dialog allows you to view and load any license keys that are applicable for this product. If you don't see your purchased license listed, please contact us and we'll help track it down. This dialog can be accessed via the My Licenses button on the Settings > Options tab (when logged in).
- Name: This column displays the name of the user associated with the license.
- Date Created: This column lists the date that each of your licenses was created.
- License Type: This column lists the license type for each of your licenses.
- License Restrictions: This column explains the restrictions for the license type of each of your licenses.
- Expiry Date: This column lists the expiry date (if applicable) for each of your licenses.
- License Key: This column displays the license key.
The Triggers feature allows you to create rules that will enable, disable, or toggle Num Lock, Caps Lock, and Scroll Lock when specific applications have focus. Using this feature, you can make sure that the key states are always set the way you like. For example, you can create a rule to force Num Lock to on any time you're using Excel.
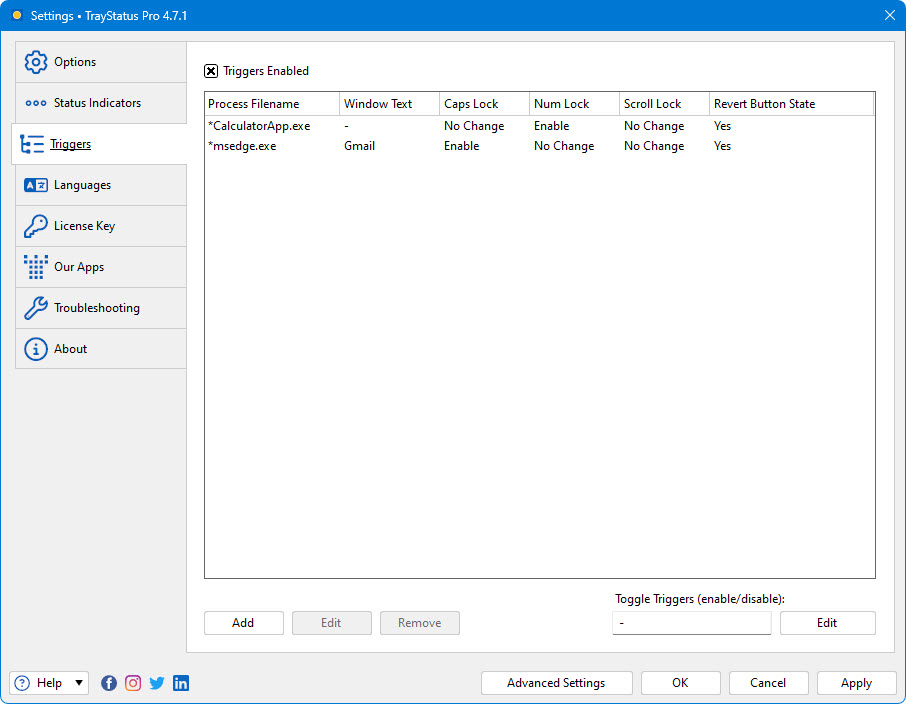
- Triggers Enabled: Enable this option to use TrayStatus Trigger rules.
- Process Filename: This column lists the path to the process that will match the trigger rule.
- Window Text: This column lists the window text that will match the trigger rule.
- Caps Lock: This column lists what the trigger rule will do with the Caps Lock state when it matches a window.
- Num Lock: This column lists what the trigger rule will do with the Num Lock state when it matches a window.
- Scroll Lock: This column lists what the trigger rule will do with the Scroll Lock state when it matches a window.
- Revert Button State: This column lists whether or not TrayStatus will revert the changes that the trigger rule made when the focused window no longer matches the rule.
- Add: Click this button to add a new TrayStatus Trigger rule.
- Edit: Click this button to edit the selected TrayStatus Trigger rule.
- Remove: Click this button to remove the selected TrayStatus Trigger rule.
- Toggle Triggers (enable/disable): This option allows you to set a key combination to use for quickly toggling the Triggers feature on or off.
The Edit Trigger window is where you'll configure the settings for the Trigger rule that will toggle Num Lock, Caps Lock, and Scroll Lock for a specific application. This window is accessed via the Add and Edit buttons on the Triggers tab in the settings window.
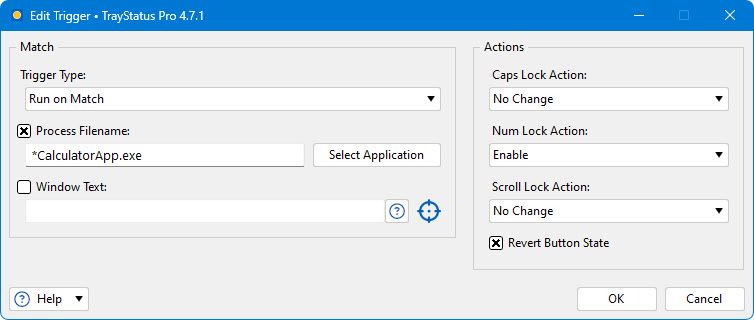
- Trigger Type: This option allows you to choose whether the trigger rule will run. The options include:
- Run on Match: The actions in this rule will run if the focused window matches the Process Filename and/or Window Text conditions.
- After no Match: The actions in this rule will run if the focused window doesn't match any other trigger rules.
- Lock Key State: The actions in this rule will run on every focused window.
- Process Filename: The path to the process name that you want the Trigger rule to match. You can use asterisks as a wildcard here. *.* will match all applications.
- Select Application: Click this button to choose from a list of currently running applications.
- Window Text: The window title of the window you want the Trigger rule to match. You can use this to match only certain windows of an application. You can drag the "target" icon and drop it on an open window to automatically get the window title.
- Drag this over a window to select that window's process in the list automatically: When you drag this target icon over a window, the Window Text field will be automatically updated with the title of that window.
- Caps Lock Action: Choose what you want to happen with the Caps Lock key when the window with the specified process or window title is focused. The options are as follows:
- No change: The Caps Lock status will not be changed
- Enable: Caps Lock will be enabled if it's not already
- Disable: Caps Lock will be disabled if it's not already
- Toggle: Caps Lock will be switched to the opposite of whatever it was when the window was focused
- Num Lock Action: Choose what you want to happen with the Num Lock key when the window with the specified process or window title is focused. The options are as follows:
- No change: The Num Lock status will not be changed
- Enable: Num Lock will be enabled if it's not already
- Disable: Num Lock will be disabled if it's not already
- Toggle: Num Lock will be switched to the opposite of whatever it was when the window was focused
- Scroll Lock Action: Choose what you want to happen with the Scroll Lock key when the window with the specified process or window title is focused. The options are as follows:
- No change: The Scroll Lock status will not be changed
- Enable: Scroll Lock will be enabled if it's not already
- Disable: Scroll Lock will be disabled if it's not already
- Toggle: Scroll Lock will be switched to the opposite of whatever it was when the window was focused
- Revert Button State: Enable this option to have TrayStatus revert the changes that this trigger rule made when the focused window no longer matches this rule.
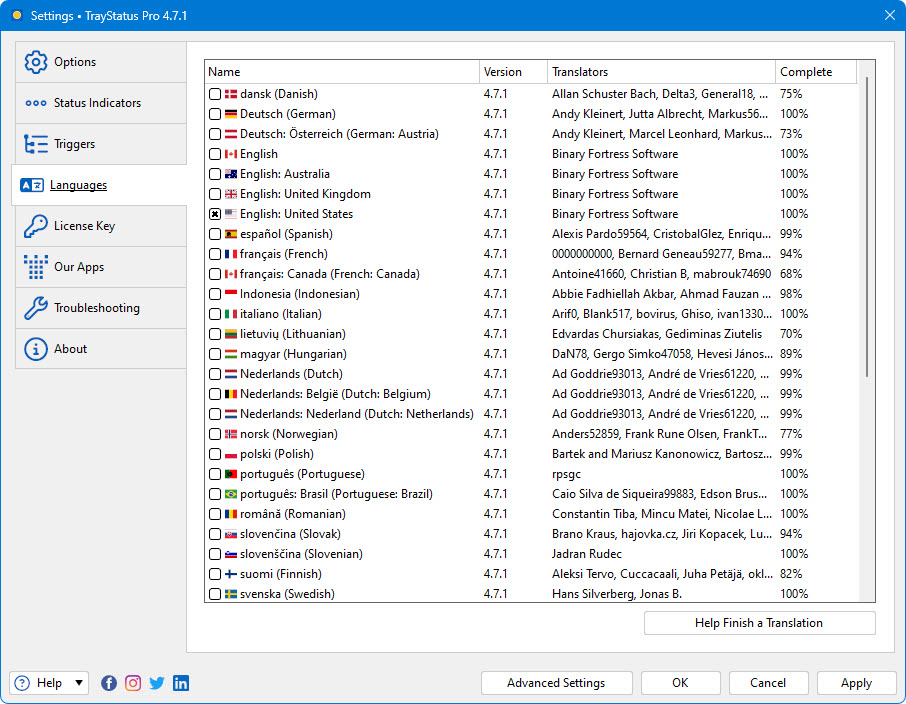
This tab in the Settings window contains a list of all the languages currently installed on your system for use.
- Name: This column shows the name of the language.
- Version: Shows the version for the Language file. This version should match the program version for best compatibility.
- Translators: Shows the contributors for the Language file.
- Complete: What percent complete the language file is.
- Help Finish a Translation: Help us finish a translation and receive a free Pro Standard license in return.
This tab in the Settings window displays your current License key, and allows you to update the License Key or revert to the free version.
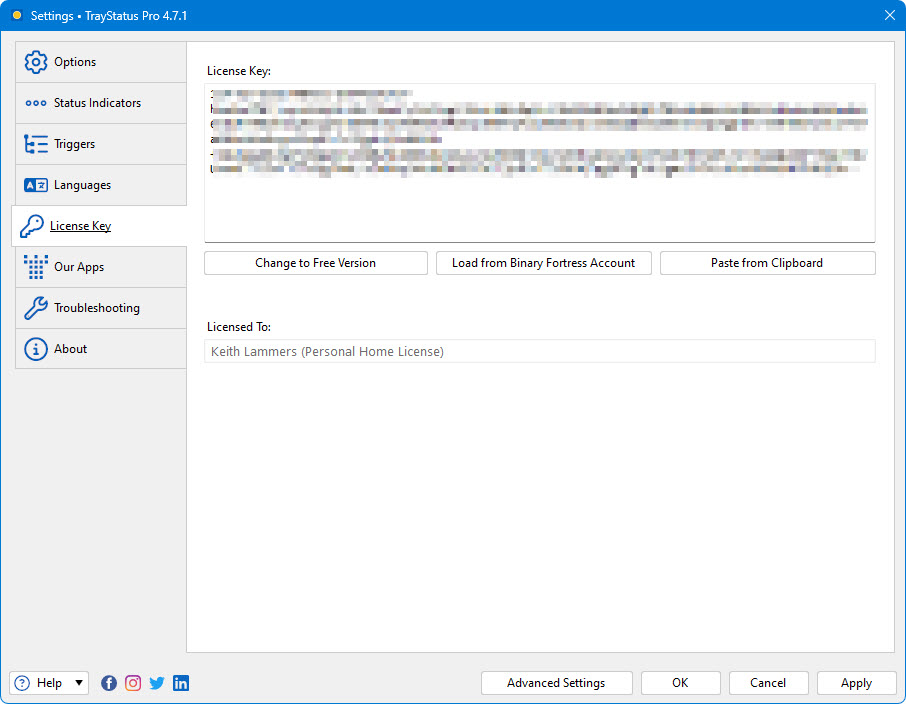
- License Key: The License Key that this application is currently using.
- Change to Free Version: At any time during the free 30-day Pro trial, you can click this button to revert back to the Free version of this application.
- Restore Trial License Key: This allows you to restore a trial license key if it was removed in error and is still valid (within 30 days).
- Load from Binary Fortress Account: Click this button to retrieve and select a license key from a list of license keys tied to your Binary Fortress account.
- Paste from Clipboard: If you have copied your license key from your email, just click this button to automatically paste it into the License Key box.
- Buy a License Key: If you're currently on the Free or Trial version, and you'd like to purchase a lifetime Pro license, click this button to be taken to the purchase page.
- Licensed To: Shows who the license key is registered to, and if it is a Site License key.
- License Expiry Date: If you are using a Trial license, this will show when it will expire.
- Request New Trial License: Click this button to submit a request to the Binary Fortress Software support team for a new 30-day trial license key.
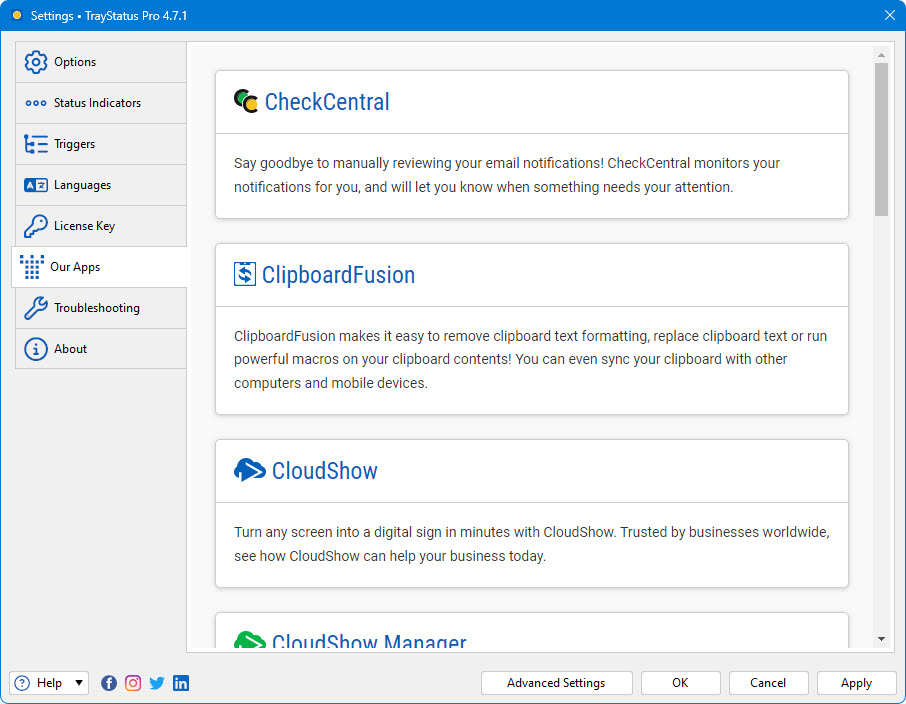
The Our Apps tab lists some of our other popular applications. If you enjoy using this application, feel free to check out our other applications as well!
The troubleshooting tab contains information and options that are only useful for troubleshooting when something isn't working correctly. The text area contains all the information required by Binary Fortress Support when submitting a help request. The button with the blue arrows allows you to refresh the information listed here.
The Logging drop-down list allows you to set the Debug Logging Level. This typically only needs to be enabled when requested by the Binary Fortress support team.
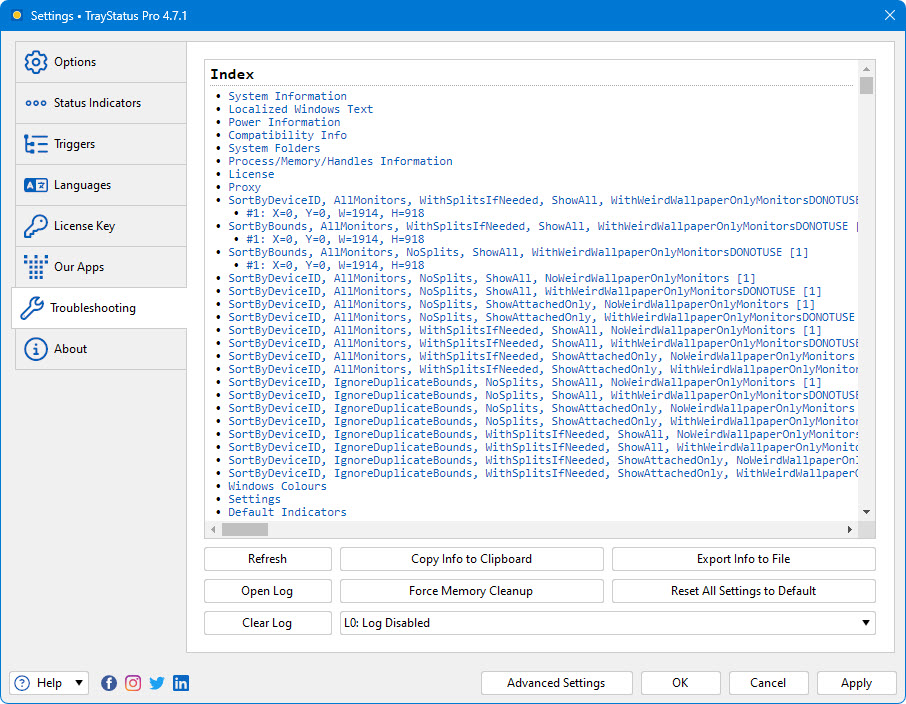
- Open Log: Opens an explorer window to the debug log file's location so you can attach it to an email, or upload it to the support forum.
- Clear Log: Clears the application debug log
- Refresh: Click this button to refresh the troubleshooting info.
- Force Memory Cleanup: This forces the application to pause and do a memory cleanup (a garbage collection) to try and free up any unneeded memory.
- Copy Info to Clipboard: Copies the information from the text area to the clipboard – you can paste this information into an email or forum post by pressing Ctrl + V.
- Log Level: This drop-down menu allows you to choose the logging level for debug logs. L0: Log Disabled is recommended for normal usage. You'll typically only want to enable debug logging to capture a log of a reproduceable issue when submitting a support request.
- Export Info to File: This will open a Save File dialog that will let you save your troubleshooting info to a file.
This dialog allows you to customize to connect to the internet to search for updates or to sync settings and profiles with your Binary Fortress account. This dialog can be accessed via the Internet Connection Settings button on the Options tab.
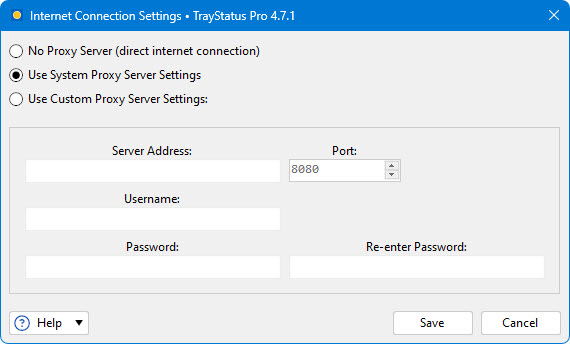
- No Proxy Server (direct internet connection): Select this option if you do not want this application to use a proxy server when accessing the Internet.
- Use System Proxy Server Settings: Select this option to have this application use the proxy settings that are configured in Internet Explorer.
- Use Custom Proxy Server Settings: Select this option if you would like to manually enter your proxy server information.
- Server Address: Enter the proxy server IP address or host name in this text box.
- Port: Enter the proxy server port in this text box.
- Username: Enter the username for your proxy server in this text box.
- Password: Enter the password for your proxy server in this text box.
- Re-enter Password: Re-enter the password (if required) for your proxy server in this text field.
- Save: Save the current proxy settings.
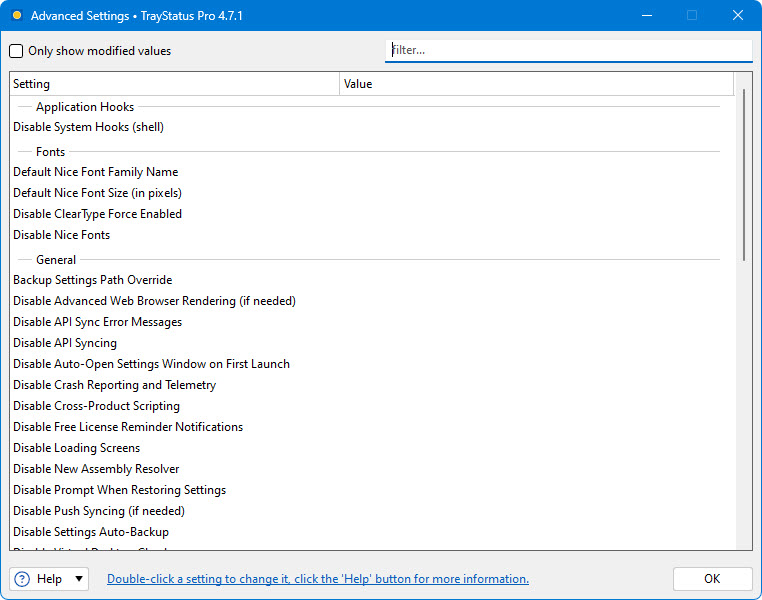
You can use these Advanced Settings to control hidden options. This window is accessed via the Advanced Settings button at the bottom of the main Settings window. For more information on what these settings control, please visit the
Advanced Settings guide.
- Only show modified values: Only show advanced settings that have a value assigned.
- Filter: The filter box allows you to search for advanced setting names. It uses the Binary Fortress Text Query syntax.
- Setting: Shows the category and name of the hidden setting that you can edit.
- Value: Shows the current value, and highlights the setting in red if there is a value set.
- Default Value: Restores the selected setting to its default value.
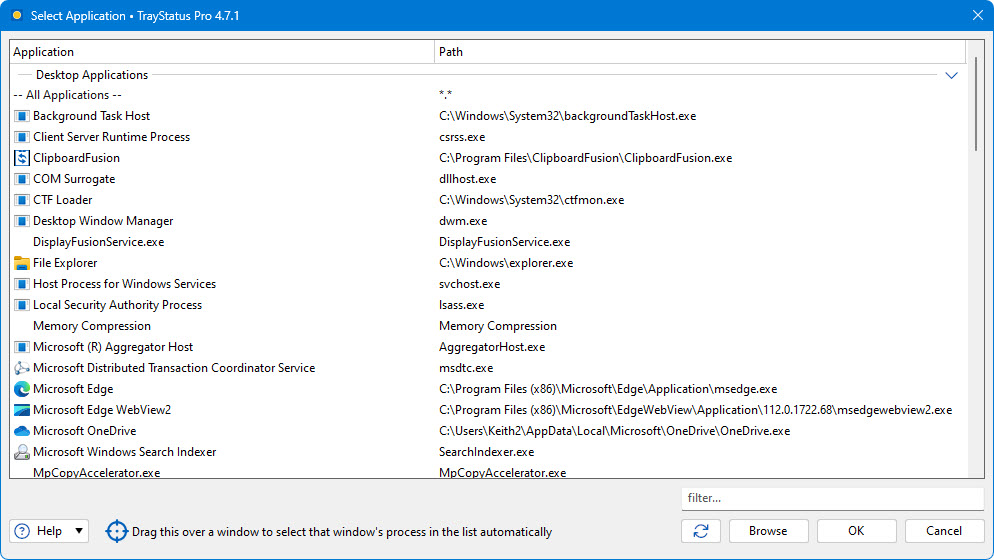
This window allows you to select from a list of currently running applications, or browse for an application on your computer. This window can be accessed via the Browse button on the Settings > Other Application tab.
- Application: Shows the application's name.
- Path: Shows the application's path.
- Filter: The filter box allows you to search for application paths. It uses the Binary Fortress Text Query syntax.
- Refresh: Click this button to refresh the list of open applications.
- Browse: Allows you to browse and select an application that isn't currently listed.
- Drag this over a window to select that window's process in the list automatically: When you drag this target icon over a window, any information about that window will be filled out automatically, like it's title, or class.
This window is displayed when a new version of the application is available.
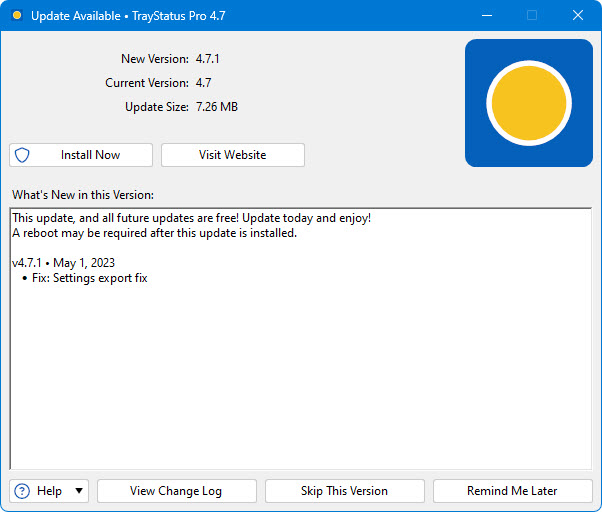
- New Version: Shows the version number of the new version, and whether or not it is a beta release.
- Current Version: Shows the version you are currently using.
- Update Size: Shows the download size of the update.
- What's New in this Version: This shows the changes that have been made to this application since the last time you installed an update. It is a helpful guide to see what new features will be available in the new version.
- Install Now: Automatically downloads and installs the update with only 1 click. (Pro only)
- Install on Exit: Automatically downloads and installs the update after you exit the program, as long as the computer isn't shutting down. (Pro only)
- Visit Website: Opens your default web browser to the application download page so you can download the latest version.
- View Change Log: Opens your default web browser and shows the Change Log. This will allow you to see what has changed since the previous version.
- Skip This Version: Closes the update window, and tells this application to never remind you about this version. Newer versions, and forcing the update check manually using the "Check Now" button will still cause the update window to appear later.
- Remind Me Later: Closes the update window, and allows this application to remind you about the update later.
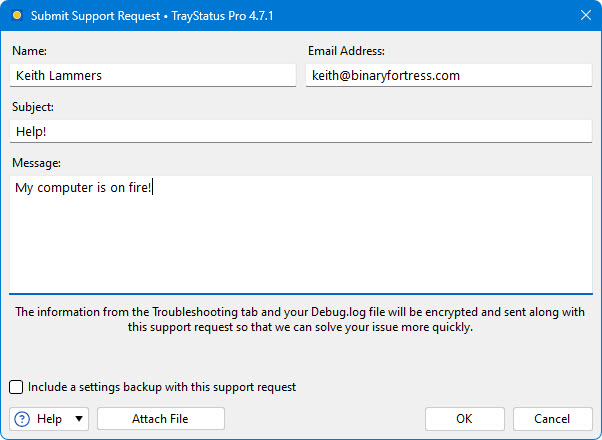
This window allows you to submit a support request, along with your Troubleshooting information and debug log (if debug logging is enabled on the Troubleshooting tab in the settings window). This window can be accessed via the Help dropdown at the bottom left of the Settings window.
- Name: Enter your email address in this text box.
- Email Address: Enter your name in this text box.
- Subject: Enter a quick one line description of your issue in this text box.
- Message: Enter a message explaining the issue that you're running into. If you clicked the Support Request button on an error message window, the error text will also show in this text box.
- Attach File: This will add an attachment to your support request.
- Clear Attachments: This will clear all attachments from your support request.
- Include a settings backup with this support request: Enable this checkbox to send a backup of your product registry Settings along with the support request.